
Raspberry Pi 4 as a Home Router – OpenWRT + AdGuard Home
Author: Yaroslav Koisa
Created on 21 February 2021
Last edit commited on 5 July 2023
Table of Contents
1. Why use Raspberry Pi 4 as a home router?
Recently I had to move to another city, to carry out few long-term on-site projects (not only IT related), and found myself in a need of a good home router, that will be compatible with OPNSense or at least OpenWRT. More often than not your internet service provider, besides the Internet service, will usually provide you with a router too. It is “certified” for the ISP network and gives you wired and wireless connectivity for all devices in your home. In most cases, people don’t bother to replace this router, because it drives up the cost and network configuration complexity. But you are here, because you are not like “most people”, when it comes to your home network, right?
There are few things in particular I hate about “consumer grade” routers:
1. Security – unpatched vulnerabilities, UPnP enabled by default, inability to separate guest and LAN clients and so on.
2. Hardware configuration – I would much rather prefer to have a separate “dumb” AP behind a proper router firewall/router, than a all-in-one device, that can’t do one of these things right, leave alone all of them at once. And don’t even get me started on the CPU and RAM configuration inside of these boxes (SMH).
3. Crippled software – WireGuard? OpenVPN? Proper access to firewall rules? MultiWAN? No, we haven’t heard about these. Here is the ability to switch your DNS server and to tweak DHCP ranges, that should be enough kid, go play outside.
I bet you can think of a number of different reasons, but this intro already takes too long, let’s wrap this up here and let’s move on to get to the setup part.
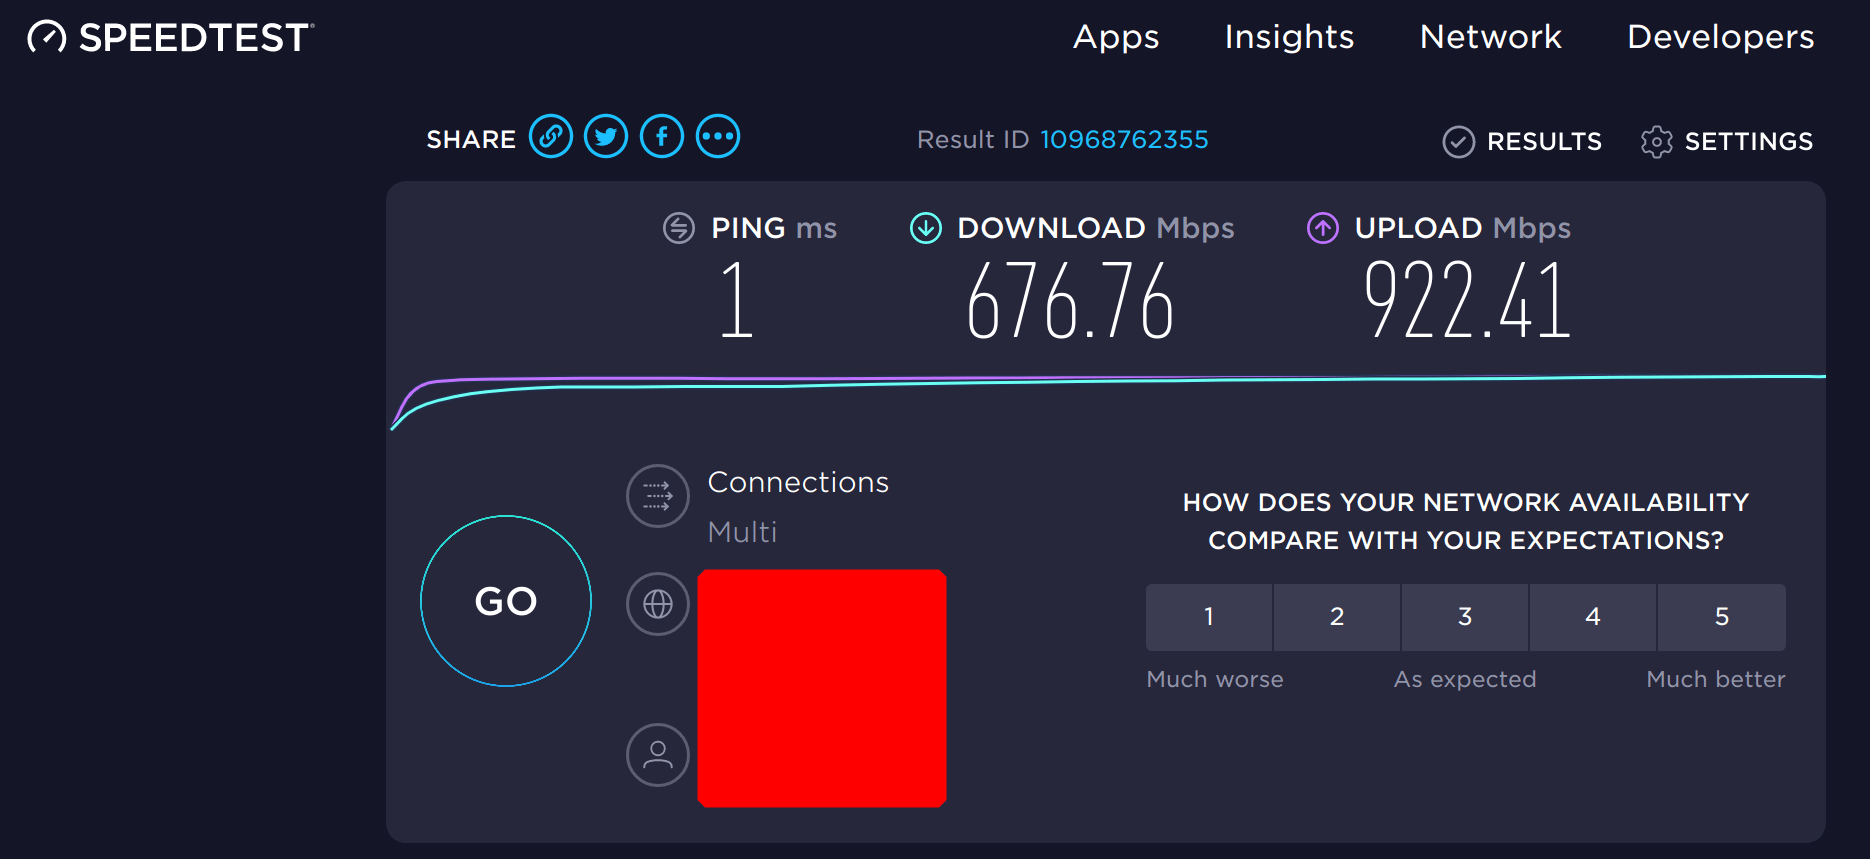
And oh, did I mention that RPi4 can route at near gigabit speeds? Well yeah, it can.
2. What's to come
This is what I am trying to achieve in the long run (or the end result I am expecting, so to say): 2 VLANs – Guest and LAN (internal networks will be connected via onboard LAN interface), 1 Gigabit DHCP connection to ISP (yes, Pi4 can route at gigabit) via external USB2Eth adapter, and now a final piece of the puzzle – external “dumb” access point (Archer C60v1, flashed with OpenWRT firmware), because WiFi on Pi is not that great – it’s a 1×1 low range antenna, which you can use to connect to the other access point (maybe your neighbour’s? jk, don’t do that) and use the WiFi connection as a failover uplink to the internet, but other than that internal antenna is garbage compared to external AP.

3. OpenWRT Installation
Disclamer:
I am by no means a OpenWRT expert, I've only used the platform for a short while, so anything you see here may and will be questioned by some of the experienced OpenWRT users, but I am happy to learn what I don't know 🙂
1. Go to OpenWRT website and download the latest firmware version for your Pi4. At the time this article was created, the only option was a snapshot version, so that’s what I am going to download here.
The link that will take you to a download:
https://downloads.openwrt.org/snapshots/targets/bcm27xx/bcm2711/

2. Once downloaded, open Raspberry Pi Imager or balenaEtcher and flash the image to an SD-card. I don’t think this step needs any explanation, so let’s move on onto the next one.
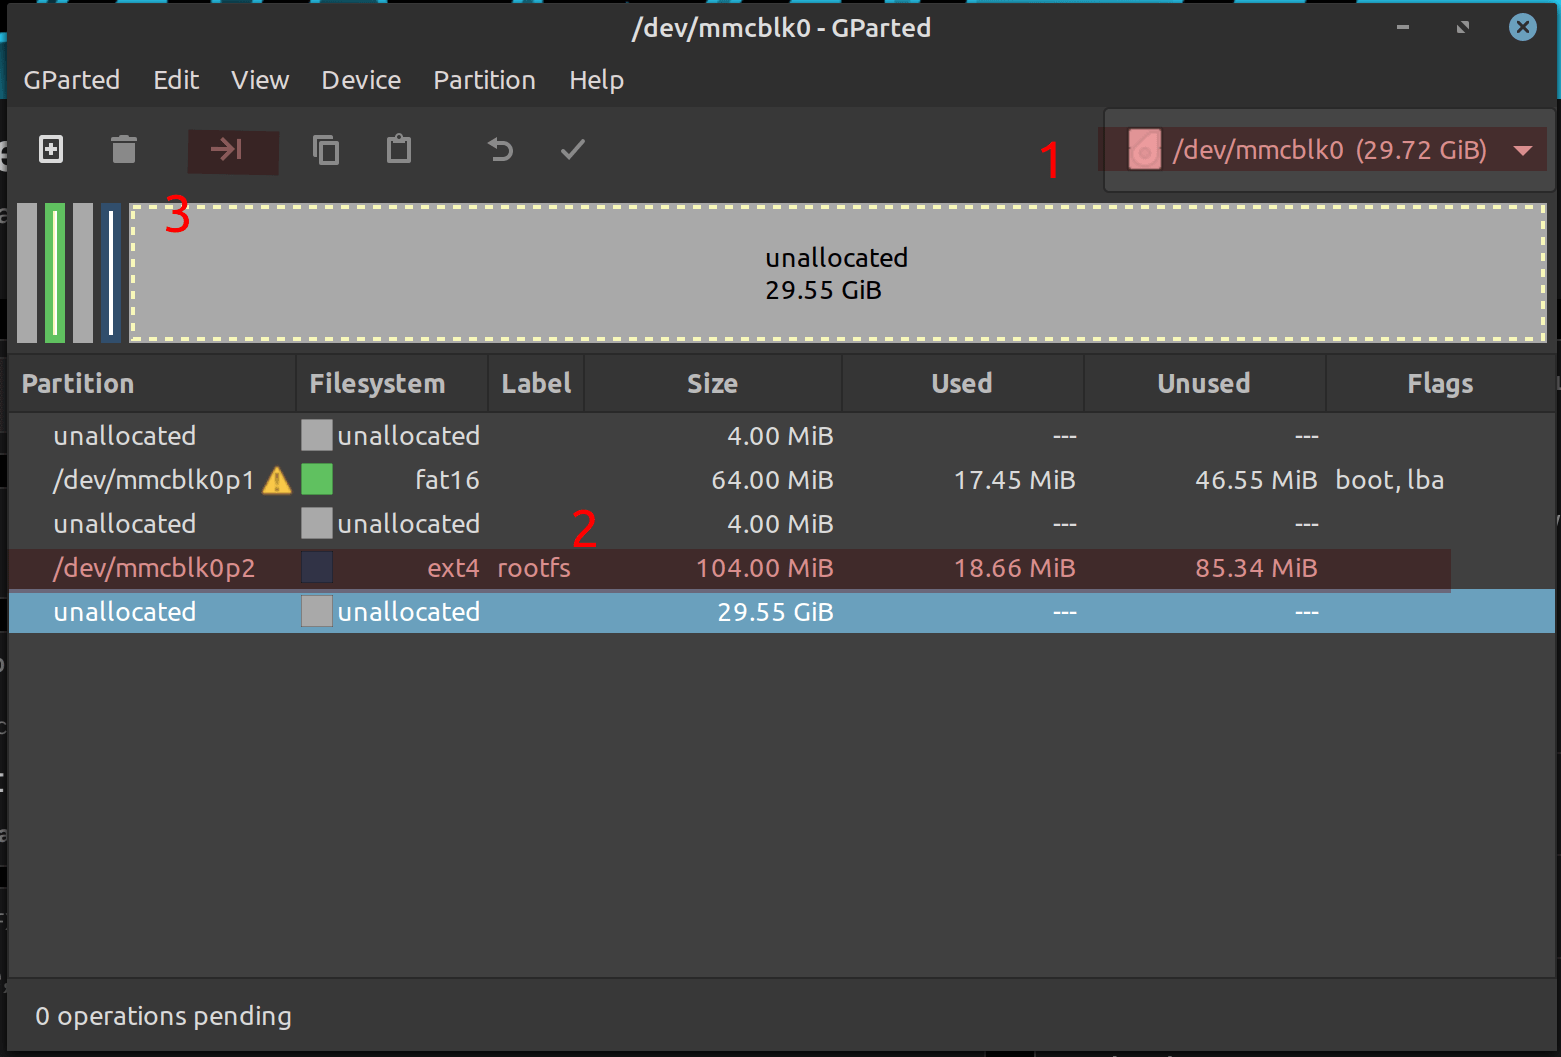
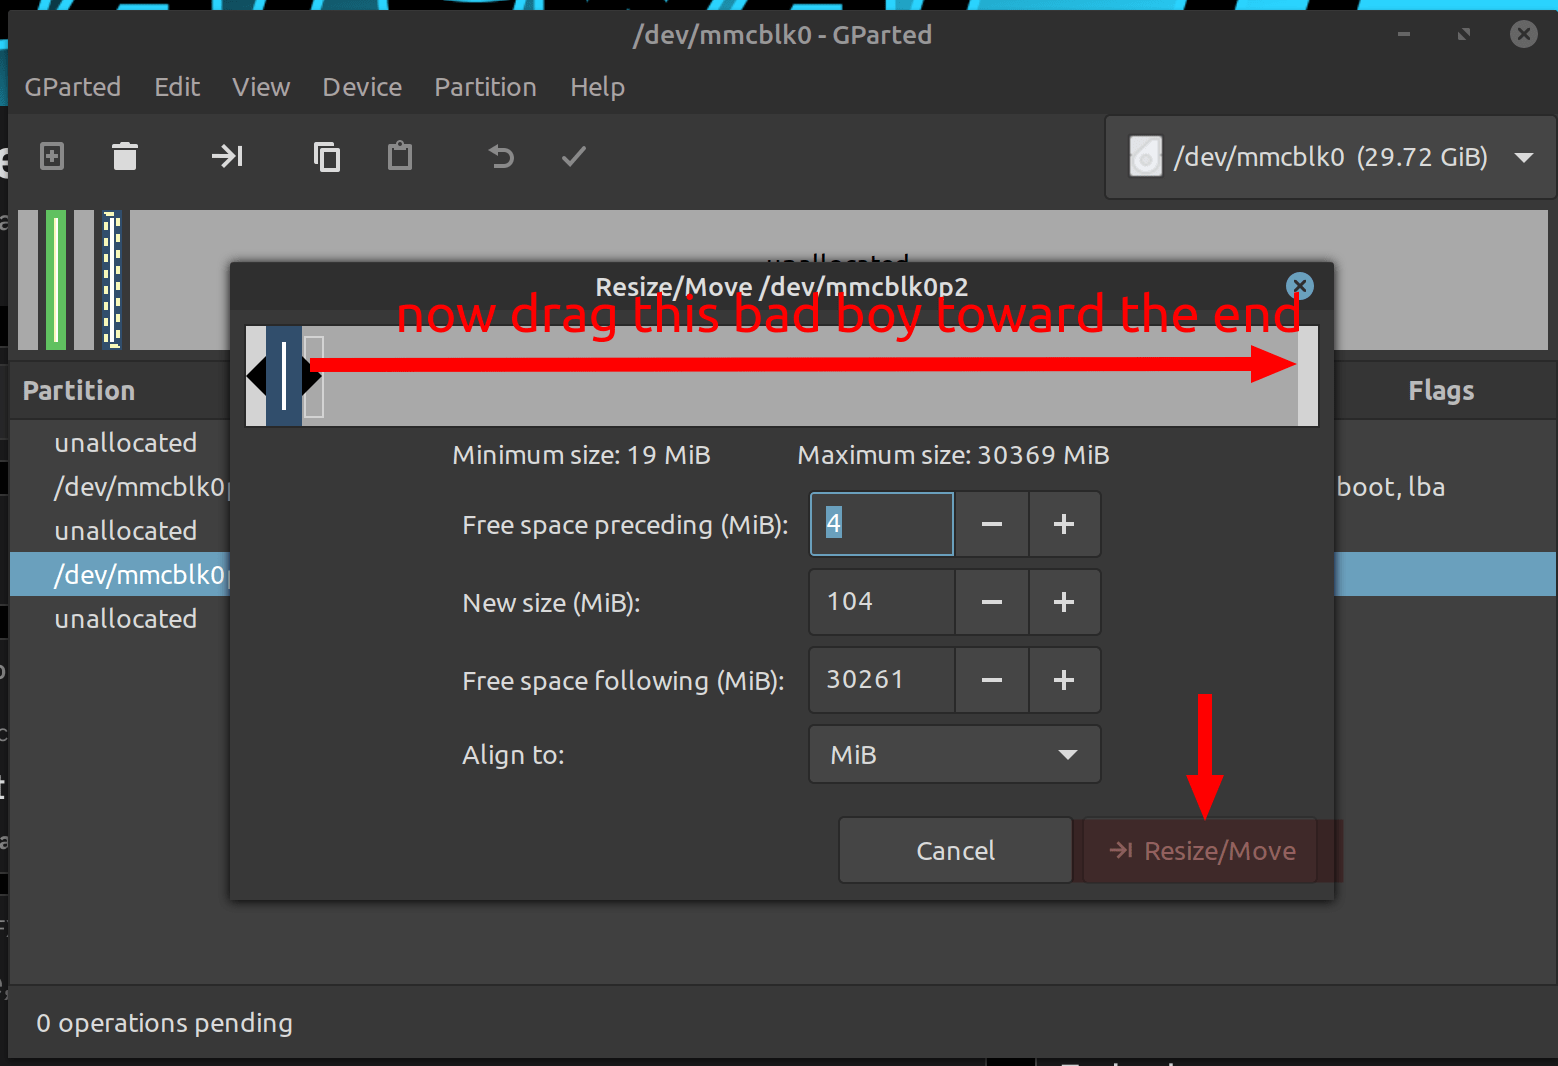
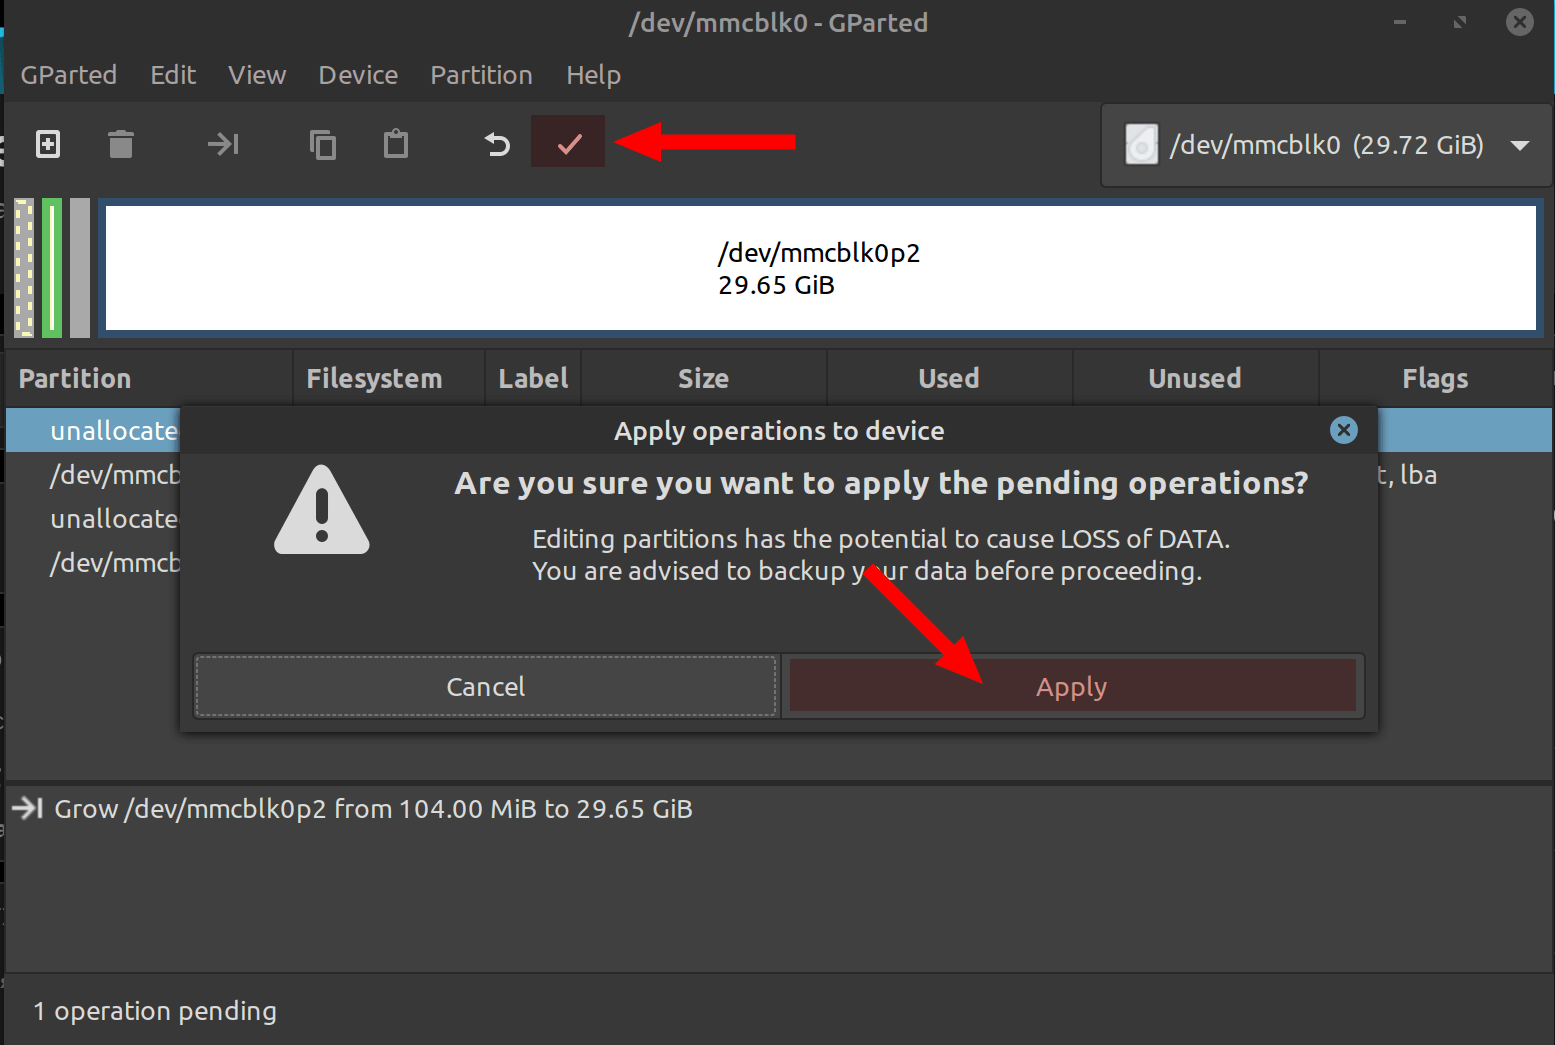
3. Unfortunately filesystem is not expanded automatically for us, so I’ll use GParted on Linux Mint to expand it.
4. Now insert the SD-card into our Pi4, and let’s start configuring the OpenWRT
4. OpenWRT initial configuration
1. When turned on, RPi4 will be assigned the address of 192.168.1.1, use the computing device of your choice to connect to it’s on-board NIC, assign yourself a static IP in 192.168.1.0/24 range, something like 192.168.1.10 with a netmask of 255.255.255.0, and ssh into Pi: ssh root@192.168.1.1 with a blank password.
P.S. if you are using Windows 10 to connect via SSH, PowerShell now supports it natively, no need to use Putty/Kitty.
2. Now, there is a little irony in this setup: in order to complete it, you’ll need an already working router, connected to the internet. We will need it in order to install Luci (WebUI for OpenWRT) and drivers for the external USB2Eth adapter. If you are wondering – snapshot versions of OpenWRT are not shipped with Luci installed by default.
3. When logged in, change the password first – it can be something weak, just temporarily, because weak password for the time being is better then no password at all.
					passwd
#Press enter
#Type in your new password, enter, repeat, done :)
4. The next step is to edit our network configuration file, so that we can connect to our existing network, use vi to do it:
vi /etc/config/network
					### Example of my LAN interface section
config interface 'lan'
        option type 'bridge'
        option ifname 'eth0'
        option proto 'static'
        option ipaddr '192.168.1.99'
        option netmask '255.255.255.0'
        option gateway '192.168.1.254'
        option dns '1.1.1.1'
P.S. If you never used vi or vim, here’s a brief overview. When you open a file, you’re in a command mode. Use your arrow keys to move the cursor to the point you want to change. Then, press “i” to switch to the editing mode, in which you can write a text and delete an existing text using the Delete key. After you make your changes, press Escape to get back into the command mode, and store your file by typing :wq <Enter> (i.e., command: write and quit).
5. Now, either run: service network restart, or reboot the device to apply changes. I am going to reboot, because I need to bring my RPi4 closed to the internet router.
					service network restart
# or
reboot
# or
shutdown
6. Trust, but verify. After the system is restarted and connected to your current home router, ssh into our new OpenWRT Pi4 and ping 8.8.8.8 to check if the routes are up, and ping google.com to check if the DNS is working fine.
					ping 8.8.8.8
# Wait for the response and then
ping google.com
7. If you passed the connectivity test, let’s install some packages to make our life easier:
					# Update the package repos
opkg update
# Install software that I'd like to have on evey one of my systems
opkg install htop nano tmux iftop
# Install LuCI webUI, for easier management
opkg install luci-ssl-nginx
# Now enable and start the nginx
service nginx enable
service nginx start
8. Enabling USB-to-Ethernet adapter:
					# I've got rtl8153, but drivers from 1852 will work just fine
opkg install kmod-usb-net-rtl8152
# If your USB2Eth is different, figure out it's chipset, then use command below to find and install the appropriate drivers
opkg list kmod-usb-net*
9. Connect your USB2Eth adapter and check network interfaces list with help of command: ip a, and confirm that your device is there, if not, reboot it. In my case it showed up just fine, with eth1 as it’s name.
					ip a

# Sample command output:
1: lo: <LOOPBACK,UP,LOWER_UP> mtu 65536 qdisc noqueue state UNKNOWN group default qlen 1000
    link/loopback 00:00:00:00:00:00 brd 00:00:00:00:00:00
    inet 127.0.0.1/8 scope host lo
       valid_lft forever preferred_lft forever
    inet6 ::1/128 scope host
       valid_lft forever preferred_lft forever
2: eth0: <BROADCAST,MULTICAST,UP,LOWER_UP> mtu 1500 qdisc mq master br-lan state UP group default qlen 1000
    link/ether 00:00:00:00:00:00 brd ff:ff:ff:ff:ff:ff
3: wlan0: <BROADCAST,MULTICAST> mtu 1500 qdisc noop state DOWN group default qlen 1000
    link/ether 00:00:00:00:00:00 ff:ff:ff:ff:ff:ff
5: br-lan: <BROADCAST,MULTICAST,UP,LOWER_UP> mtu 1500 qdisc noqueue state UP group default qlen 1000
    link/ether 00:00:00:00:00:00 brd ff:ff:ff:ff:ff:ff
    inet 192.168.1.1/24 brd 192.168.1.255 scope global br-lan
       valid_lft forever preferred_lft forever
    inet6 fe80::dea6:32ff:feac:78c9/64 scope link
       valid_lft forever preferred_lft forever
6: eth1: <BROADCAST,MULTICAST> mtu 1500 qdisc noop state DOWN group default qlen 1000
    link/ether 00:00:00:00:00:00 brd ff:ff:ff:ff:ff:ff
10. Now that our system is ready, go ahead and configure your interfaces, install all of the required packages and so on. Come back when you are ready to install and configure AdGuard Home.
5. AdGuard Home Installation and Configuration
1. SSH into your newly configured OpenWRT box, and execute opkg update, and then opkg install adguardhome. Or install the same package via LuCI.
					opkg update
opkg install adguardhome
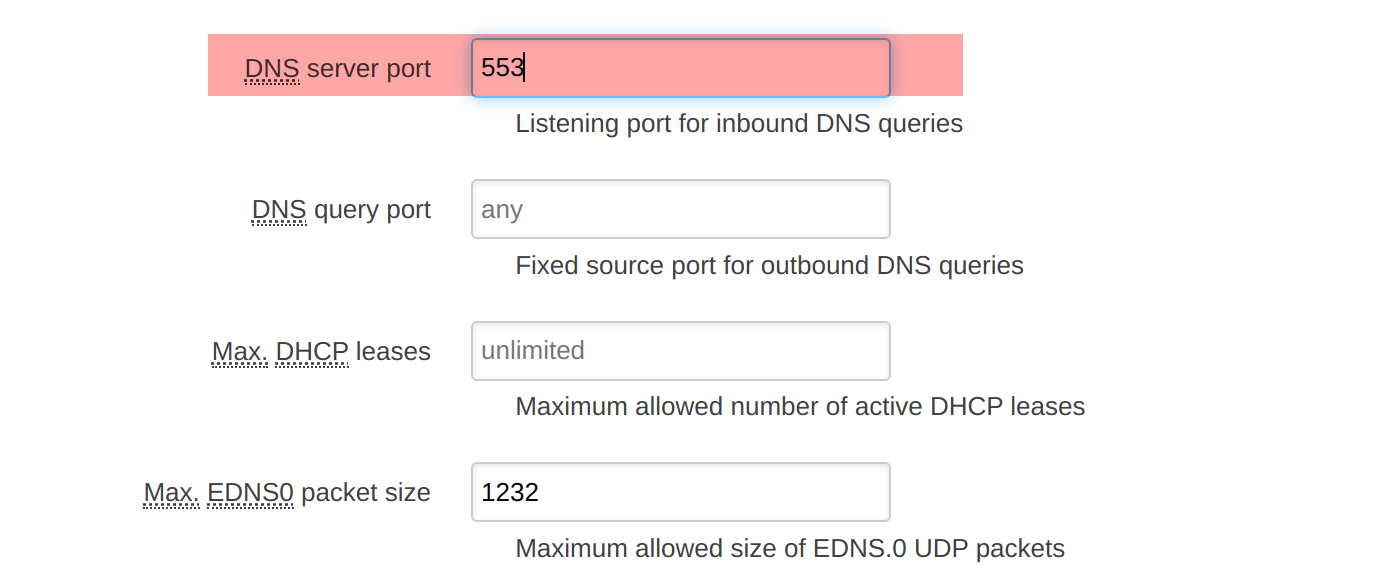
2. In LuCI go to Network -> DHCP and DNS -> Advanced Settings -> DNS Server Port, and change it to 553, otherwise AdGuard Home won’t work. Save and apply changes.
3. Switch to SSH and execute the following:
					mkdir /root/adguardhome
nano /etc/init.d/adguardhome
# Replace -w option from tmp to root, like this:
# OLD:
# procd_set_param command "$PROG" -c /etc/adguardhome.yaml -w /tmp/adguardhome --no-check-update
# NEW:
# procd_set_param command "$PROG" -c /etc/adguardhome.yaml -w /root/adguardhome --no-check-update
service adguardhome restart
This will ensure that our AdGuard Home DNS database and configuration is persistent between reboots. I don’t know how great of idea it is to leave it in /root/, only time will tell (or expert users in my YouTube comments section, not a sarcasm, I’ve got a very decent and smart audience).
4. Go to http://:3000, in my case http://192.168.1.254:3000 and configure AdGuard Home as usual, change WebPort to something different than 80 (8080 for example), and leave DNS port at 53.
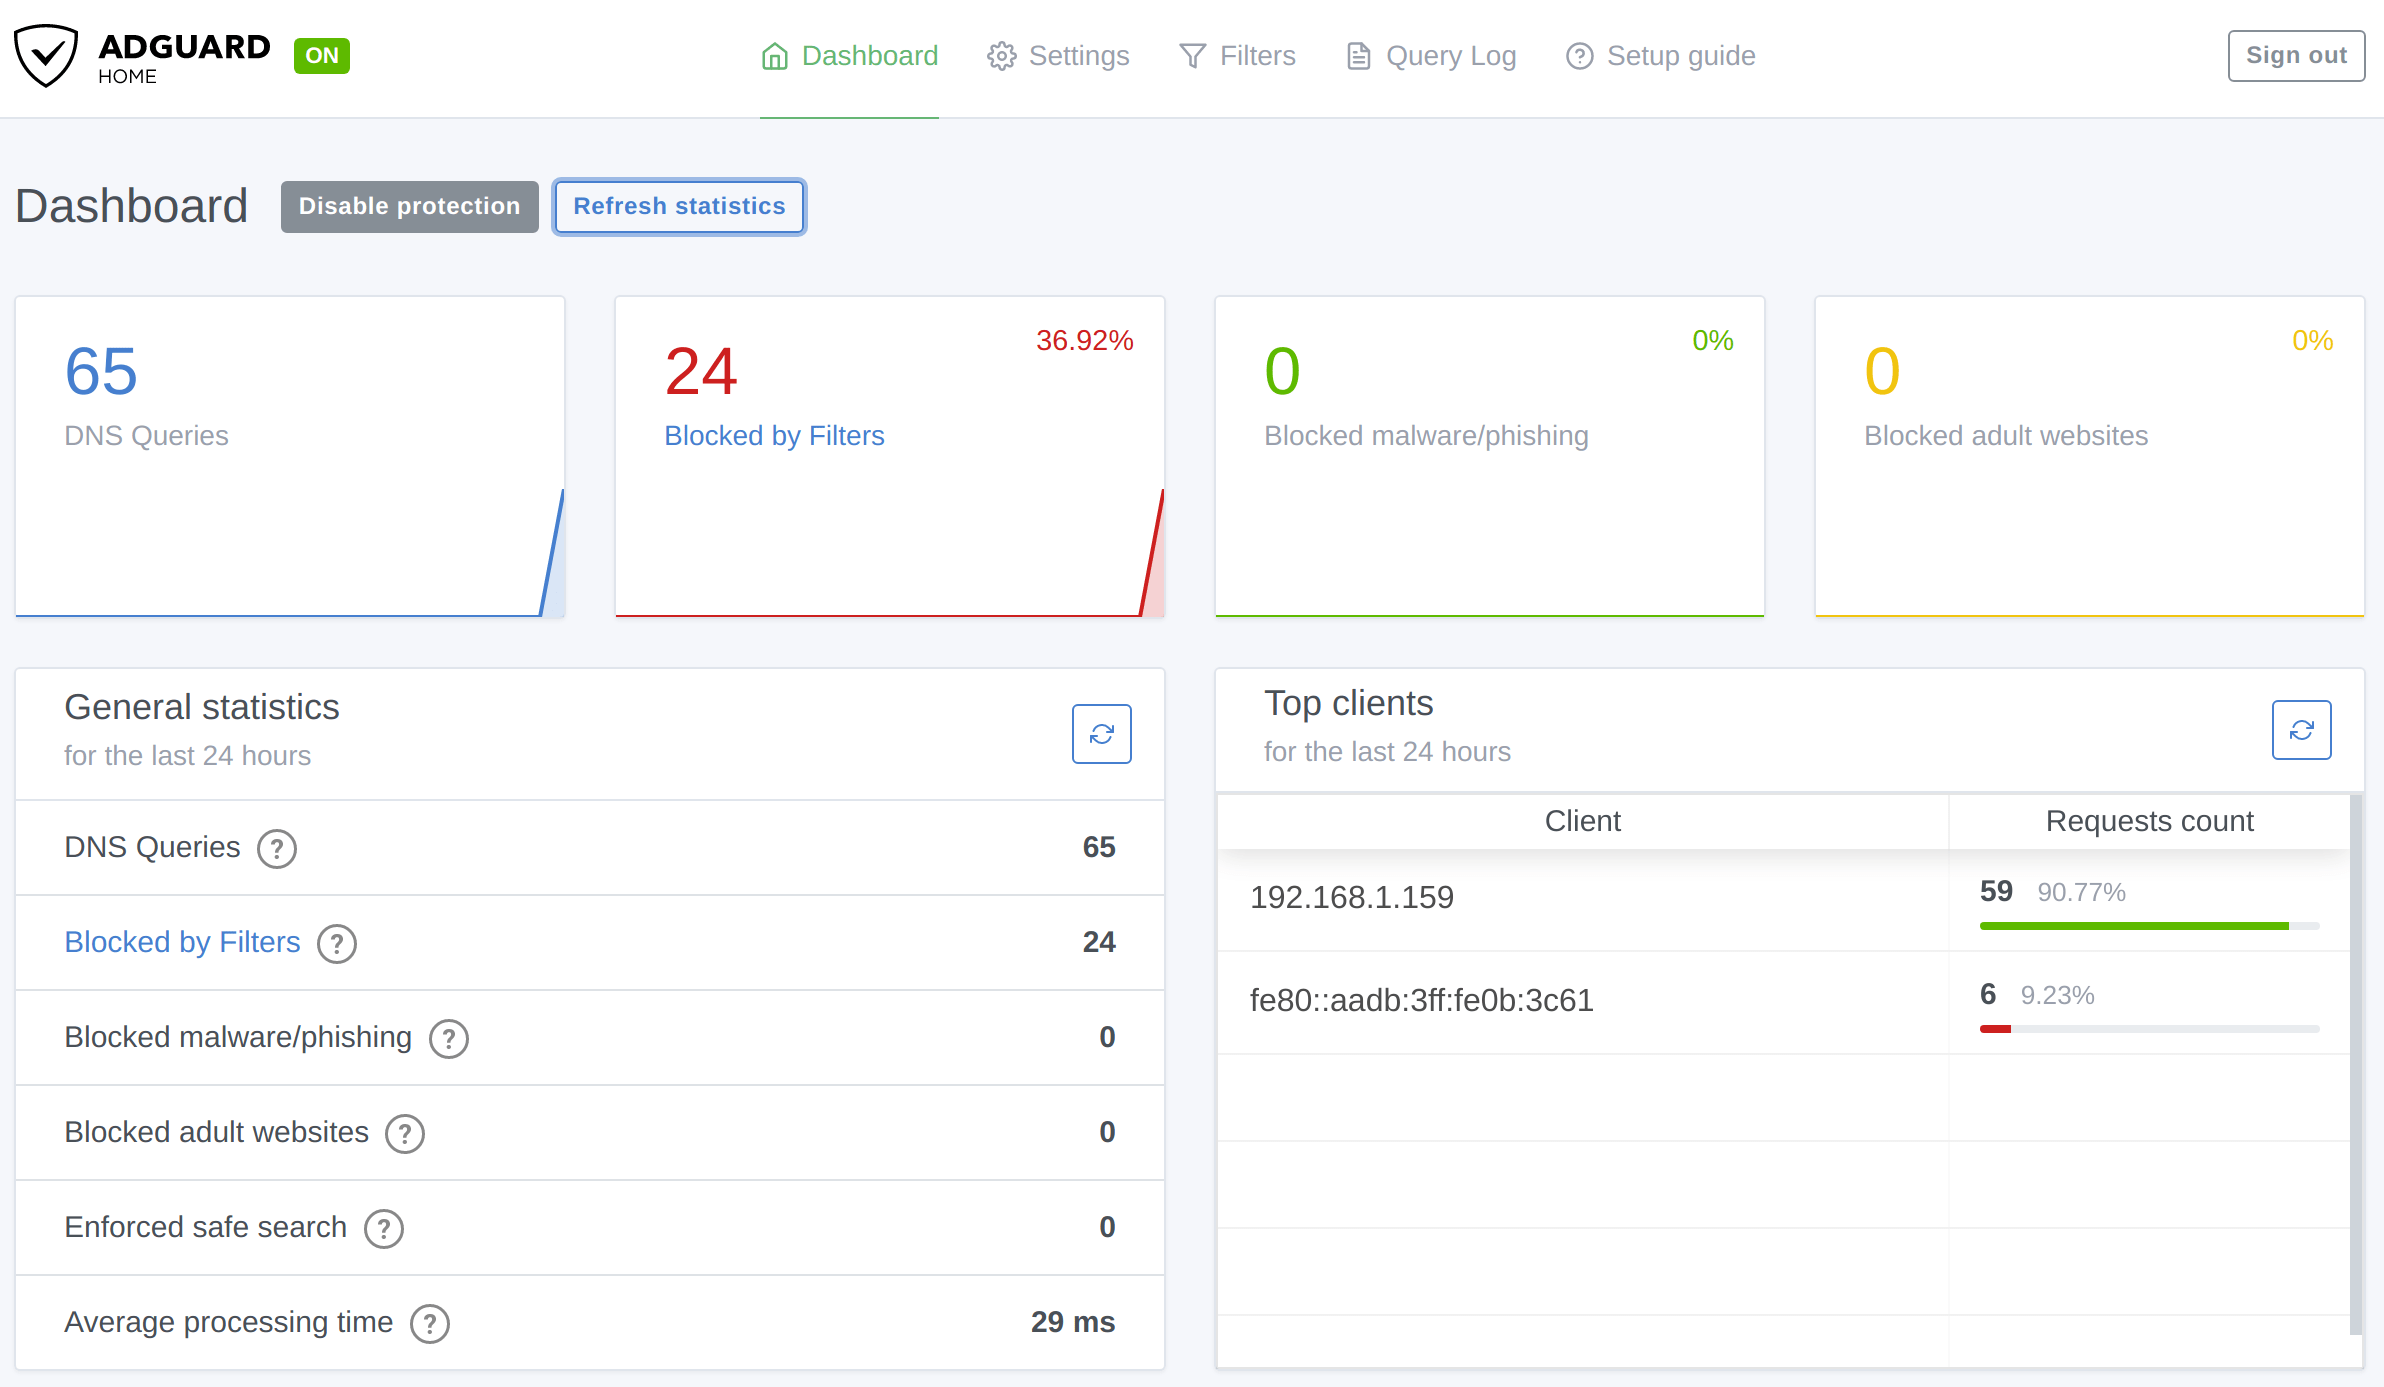
5. Now reboot the device and check if your AdGuard WebUI resets the stats. If it does, something is wrong, but if it doesn’t – congratulations you’ve got yourself a decent router with built-in ad protection.
6. Conclusion
In my case, the experiment to use RPi4 as my router turned out well, and I decided to stick with this setup for the time being. After a long time, I have tried something other than pfSense/OPNSense: OpenWRT on RPi4 with the latest patches, which gives me 4 GB of RAM and almost 30 GB of storage. I’m pleased that, finally, we have development boards capable of replacing proprietary SOHO network equipment. Such boards may shape the segment of home networking significantly in upcoming years.
Support Our Blog! 👨🏻💻
Donate and Help Fuel the Knowledge Sharing
🙏 Every Donation Counts: No amount is too small! Your contribution, regardless of its size, makes a significant impact and is greatly appreciated.
💡 Encourage Ongoing Research: Donations enable me to dive deeper into topics, conduct experiments, and bring you the latest trends and insights in the field.
📚 Keep the Knowledge Flowing: Your donations will help me dedicate more time and resources to curating and producing insightful blog posts, tutorials, and guides.