
Become a Storj Node Operator: Step-by-step tutorial
Author: Yaroslav Koisa
Created on 2 November 2020
Last edit commited on 5 July 2023
Table of Contents
Link to our YouTube video:
https://www.youtube.com/watch?v=Yqmaupvt6AY
1. Introduction to Storj
Storj is an S3-compatible platform and suite of decentralized applications that allows you to store data in a secure and decentralized manner. Storj pays you for your unused hard drive capacity and bandwidth in STORJ tokens!
Source: https://documentation.storj.io/
Storj is a very nice project with cool concept of data encryption and decentralisation, but I feel like their documentation is overwhelming for new users, especially for those who spent their entire life with Windows OS family or fancy GUIs that abstract the back end. Then one of our subscribers (hi Paul) brought to my attention that he was interested in getting into Storj mining (or hosting, however you want to call it), but was unable to start because of confusing instructions on the main project website. So now comes this blog post (and YouTube video) which is made for people who don’t fully understand the concept of servers, linux, docker and so on, but they really want to contribute to a Storj storage pool and get some rewards in return, of cource.
So where do you start exactly? Well, that’s a good question, and now that you know what the Storj is, let’s dive into the Storj mining.
We made a video covering how much you can earn with Storj monthly. I really recommend you watch it first, if you still haven't:
Storj Mining in 2020 - How much you can earn being a Storj Node Operator
Link in the form of text:
https://www.youtube.com/watch?v=xj_Zbdw9TEA
Link in the form of text:
https://www.youtube.com/watch?v=xj_Zbdw9TEA
If you just made up your mind and decided you’d like to start mining Storj, let me cover some basics for you first then. To mine Storj (or host and share Storj data in other words) you need to become a Storj Node Operator. Anyone can do that, the process actually only requires few things, and about 40 minutes of your time. This guide will cover Debian 10 and Raspbian 10/Raspberry Pi OS 10 only, to make it less complicated.
If you need a walk through for any other operating system, please checkout the official documentation.
2. Requirements to become a Storj Node Operator
I am about to walk you through the Storj Node enrolment and installation, but before that make sure you meet the criteria required by the project.
A spare computer hardware or some free resources on your hypervisor of choise.
This can be an old laptop, Raspberry Pi 3b/4 (2GB or 4GB version, because with 8GB you'll waste a lot of resources), FreeNAS or TrueNAS, ProxMox, and effectively anything that will run Docker well inside of the VM or baremetal, it doesn't affect it too much.
1 processor core
If it's a VM, ideally give it some more cores, like 2 to 4, in my experience it boosts your earnings by a fair bit, but one core is a minimum requirement. Just don't over-provision it, it's not worth your resources.
Minimum 550GB of available disk space
550GB is a minimum expected free space you need to have in order to participate in a Storj network. For example, if your disk is 1TB, then you'll be able to share around 800-850GB. Storj recommends to keep 10% of free space for network metadata, and another 50GB you'll need for an operating system.
Internet connection with no traffic limits
Last month Storj used nearly 2TB of my bandwidth. ISP that can provide you with unlimited traffic is a must.
Average connection speed of 50Mib download and 50Mib upload.
For testing purposes, and to provide you with a good info, I once tried to host Storj node on my ADSL internet line in London. It wasn't a pleasant experience, line was constantly under the heavy load, I couldn't work, I couldn't watch YouTube and so on. It was a BT line with 50Mib down and 15Mib up. Upload speed was the main bottleneck back then.
High uptime expectation of 99,5%
The more you stay online - the better. Storj has a reputation system in place, which will check your connection speed and reliability, your uptime and few other things. In other words, the machine, which is a part of storj network, expected to always be online.
Crypto wallet to receive your rewards from Storj
You'll need an online wallet to receive your Storj tokens each month. I recommend https://www.myetherwallet.com
3. Auth token enrolment process and Storj identity generation
If you can pass all the requirements, it’s time for an enrolment process and identity generation. This step was put in place by Storj team in the latest v3 release, to prevent bad actors from easily entering the network. To get the auth token and generate your Storj identity, you need next:
- A working email address, which you’ll use to sing up for an Auth Token. At the earlier Storj v3 development stages I had to wait up to 7 days to get it, but since project got out of beta, tokens usually arrive instantly. To get your own token go to https://documentation.storj.io/before-you-begin/auth-token click “Sign up” and follow the instructions on a page.
- A working installation of Debian 10 or Raspbian 10 (Raspberry Pi OS). Installation guides for these systems are available all over the YouTube.
3.1. Generate your identity
After you receive your auth token, SSH into your debian system and execute next command sequence:
For Debian 10 x64 (VMs or regular computers/laptops)
##login as root, for example: su or sudo su
apt update && apt install -y tmux curl unzip
cd /root/
curl -L https://github.com/storj/storj/releases/latest/download/identity_linux_amd64.zip -o identity_linux_amd64.zip
unzip -o identity_linux_amd64.zip
chmod +x identity
tmux new "./identity create storagenode"
For Raspbian 10/Raspberry Pi OS 10 (for Raspberry Pi)
##login as root, for example: su or sudo su
apt update && apt install -y tmux curl unzip
cd /root/
curl -L https://github.com/storj/storj/releases/latest/download/identity_linux_arm.zip -o identity_linux_arm.zip
unzip -o identity_linux_arm.zip
chmod +x identity
tmux new "./identity create storagenode"
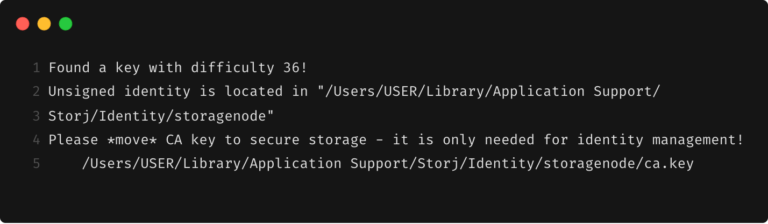
Keep the process running until it finds the key. It might take from few minutes, up to few days. You should see something like this:
3.2. Authorize the identity
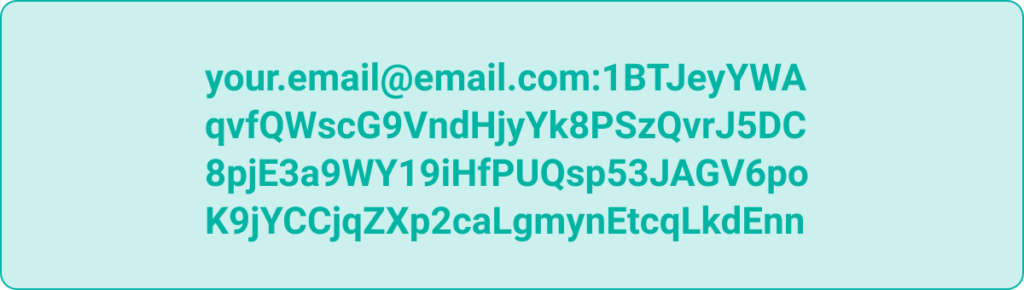
With an auth token and identity ready to use, we can authorise our identity file on the Storj Network:
./identity authorize storagenode email:characterstring
##For example:
./identity authorize storagenode user@gmail-not-a-fake.com:4UGHKQDP42LNFW5YGM8CPRL84HKXL88YAVZERXCRWTMFZP77DC7
3.3. Confirm the identity
Run the following command to confirm you have the required identity files:
grep -c BEGIN ~/.local/share/storj/identity/storagenode/ca.cert
grep -c BEGIN ~/.local/share/storj/identity/storagenode/identity.cert
The first command should return 2, and the second command should return 3:
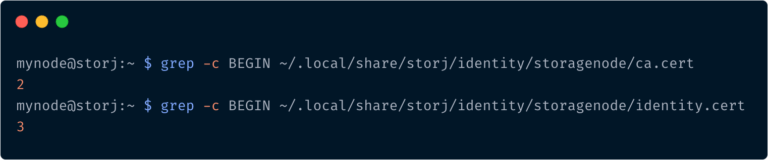
If your numbers are different, then authorizing the identity was not successful. Please try confirming the identity once again.
Always backup your identity files! This allows you to restore your Node in case of an unfortunate hardware or OS incident.
Your identity folder is located in:
~/.local/share/storj/identity/storagenode
4. Port forwarding
I can’t walk you through on how to open ports on your router, because it’s different for everyone. But I will provide you with all the information you need, in order to open all the necessary ports for Storj Node to work. If you don’t have a static IP provided by your ISP, go ahead and subscribe for a dynamic DNS name with one of the DDNS providers, like NO IP: https://www.noip.com
At the moment there is only 1 port you need to forward, and that port is: 28967. If you require a dashboard access over the internet, then port-forward also this one: 14002. As far as I am aware, there are no security issues in doing so, but it’s not usually recommended (I mean exposing the dashboard access port to the internet).
5. Install Docker
Run this oneliner to install docker on your system. You need to be logged in as root!
curl -s https://get.docker.com/ | bash
Docker is designed to run software inside containers, which are something similar to virtual machines, but much more resource efficient (and a little less secure). Storj Node software was made to run inside a docker container, which works best on linux, that’s why it is not recommended to run it on Windows or Mac systems.
6. Run my helper script to start the Storj Node and watchtower docker containers
At this point, connect your external drive if there is one, and format it in ext4.
Here is a link that shows how to do it: https://www.techwalla.com/articles/format-linux-disk
Don't forget to add it to /etc/fstab, to mount it automatically on every system start up. Information on how to it, is included in the liked article.
Don't forget to add it to /etc/fstab, to mount it automatically on every system start up. Information on how to it, is included in the liked article.
Run oneliner below, which will do the next:
- Will ask you for your wallet address, email address, IP address of your node or dynamic DNS address, how much storage you’d like to share, and the storage path.
- Will check if all the entries were populated, but it will not check if they are right, be extra careful when you are typing them in.
- Will create a file /root/storj.sh with all the entries required. This shell file will be responsible to start and restart your storage node in the future.
- Will create a record inside crontab to autostart and update Storj Node Software during the system startup.
- Will print out the Dashboard address at the end, for you to easily access it.
curl -s https://raw.githubusercontent.com/yaroslav-gwit/storj-node-helper-script/main/storj-node-helper-script.sh -o storj-node-helper-script.sh && bash storj-node-helper-script.sh
Just as a side note: if you run this script again, it will just update the values you’ll give it. It’s safe (and recommended) to use it every time you need to expand your storage, change the wallet address, IP or DNS address, etc.
7. Final words
By now you should have your Storj Node up and running. SSH into this box time to time and apply security patches ( apt update && apt upgrade ), remember it’s exposed to the internet. Ideally, read on how to make Debian auto-update itself with all the security patches automatically, every night. Would love to leave feedback? Get in touch with us in the video comments on YouTube or via email: help@gateway-it.com.
Consider donating towards our project, to support a future content release